Tag: juvopos

  • Splitting an Item in POS

    To split an item in the POS:

    1. Select the item you want to split.
    2. Tap the Split button.
    3. Press and hold the item until the split option appears.
    4. Enter the number of splits you want.
    5. The item will now be split into the selected number of portions.

    If you want to move items to other checks:

    1. Tap Add Check to create another check.
    2. Drag and drop the items to the desired check.
    3. You can verify that the items were split correctly by switching between the different checks.

    The items are now successfully split between the checks.
  • Record a Refund – Juvo POS

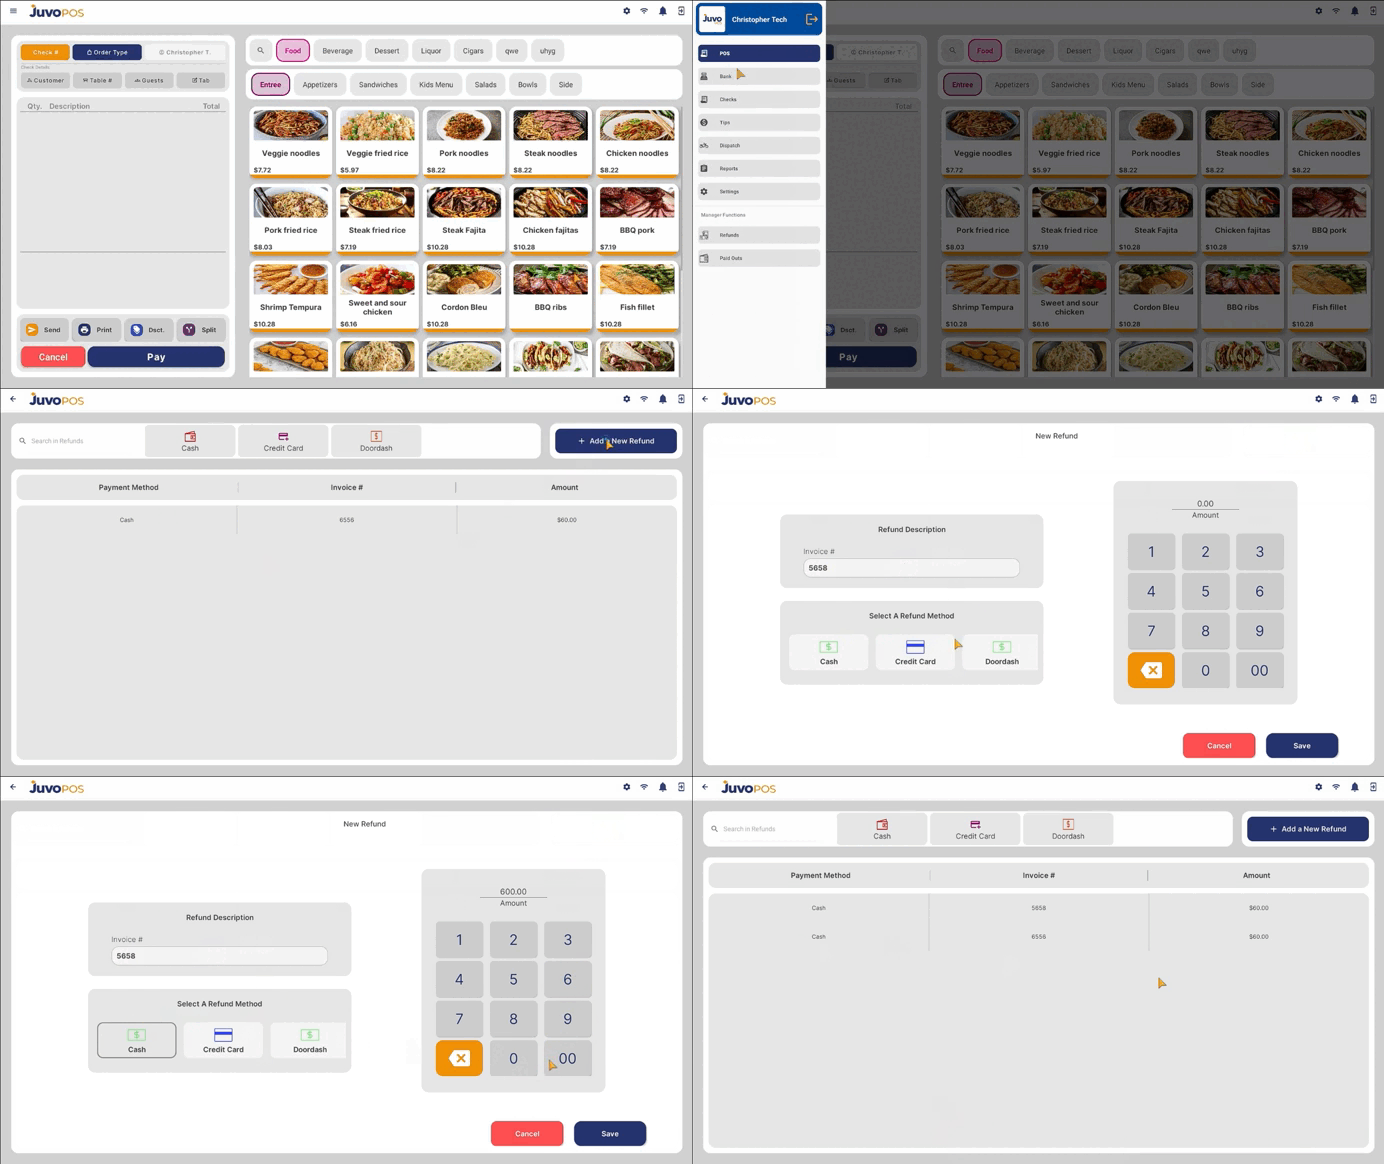
    In this guide, we will learn how to record a refund in Juvo POS.

    1. From the main POS screen, open the Functions menu.
    2. Select Bank, then choose Refund.
    3. To record a new refund, enter the Invoice Number associated with the refund.
    4. Select the appropriate Refund Method.
    5. Enter the Refund Amount.
    6. Review the information entered and tap Save to record the refund.
    7. Once the process is completed, a confirmation message will appear: “Refund saved successfully.”

    Recording refunds in Juvo POS allows you to document refund transactions and maintain an accurate record of your business operations.

  • Adding Items to a Check – Juvo POS

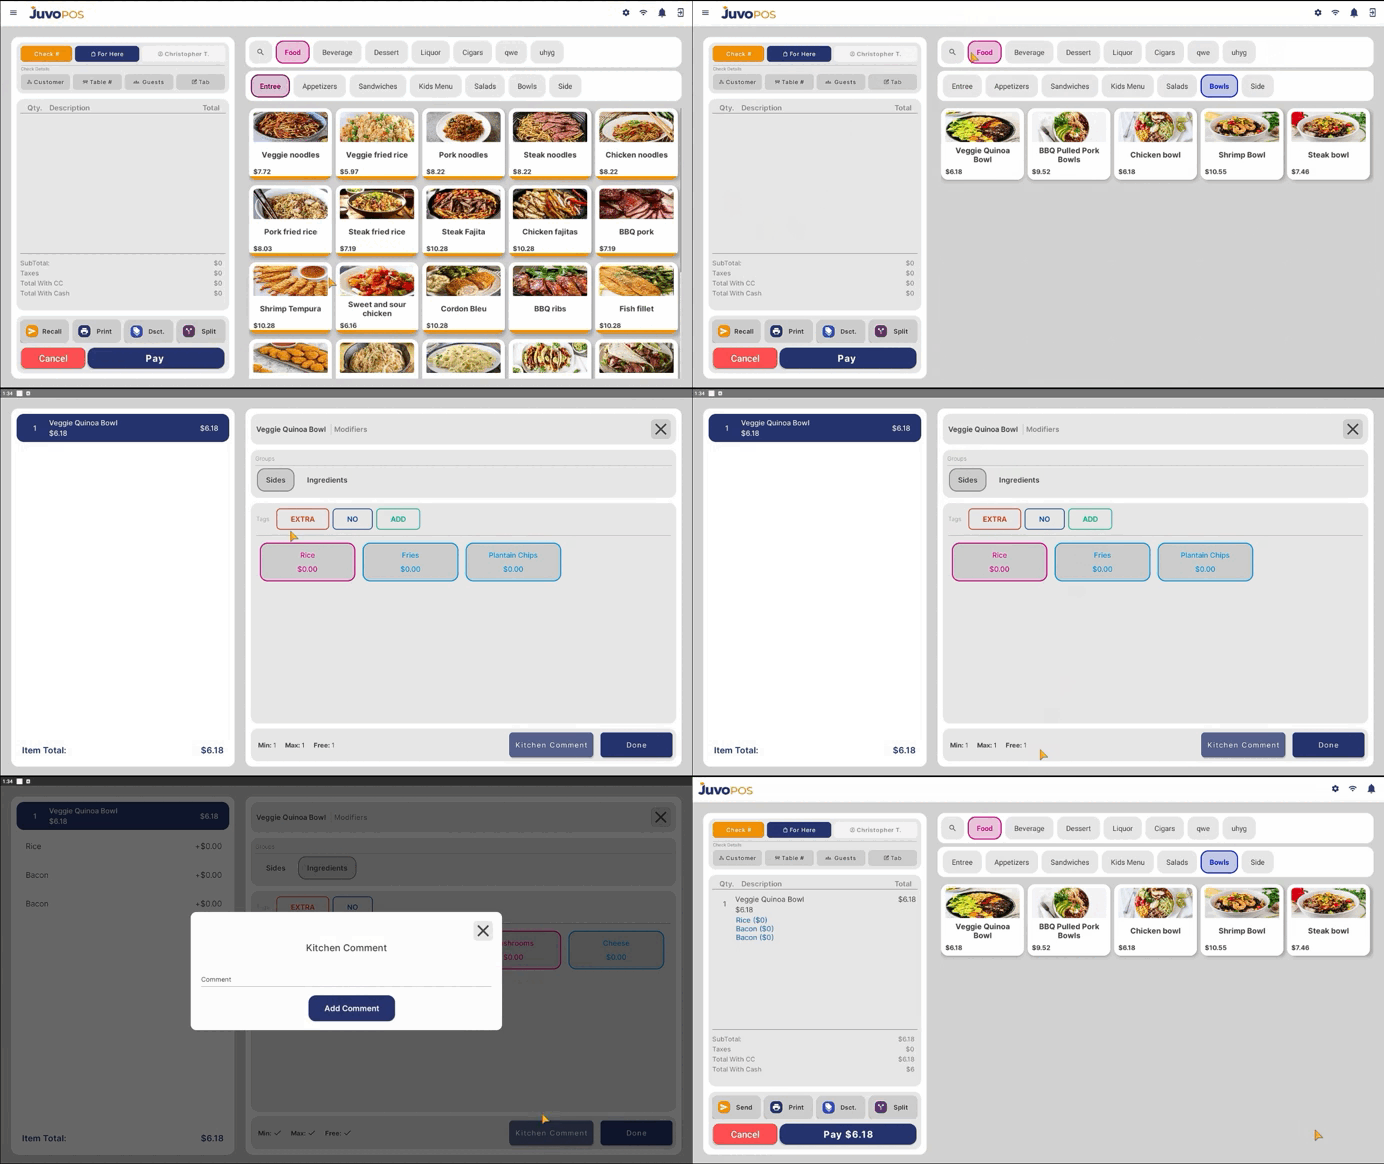
    In this guide, we will learn how to add items to an open check in Juvo POS, select modifiers, and include kitchen comments when needed.

    1. Open a new or existing check to begin adding items to the order.
    2. Find the item you want to add by using the Search Bar or browsing through the available Categories and Subcategories in your menu.
    3. Select the desired item to add it to the check.
    4. If the item has modifiers, carefully review and select the appropriate options before proceeding.
    5. If necessary, add a Kitchen Comment to provide special instructions or additional information for the kitchen staff.
    6. Review the selected items, modifiers, and comments to ensure the order is correct.

    Adding items in Juvo POS allows you to build orders efficiently while ensuring that special requests and item modifications are communicated correctly to the kitchen.

  • Split and Combine Checks – Juvo POS

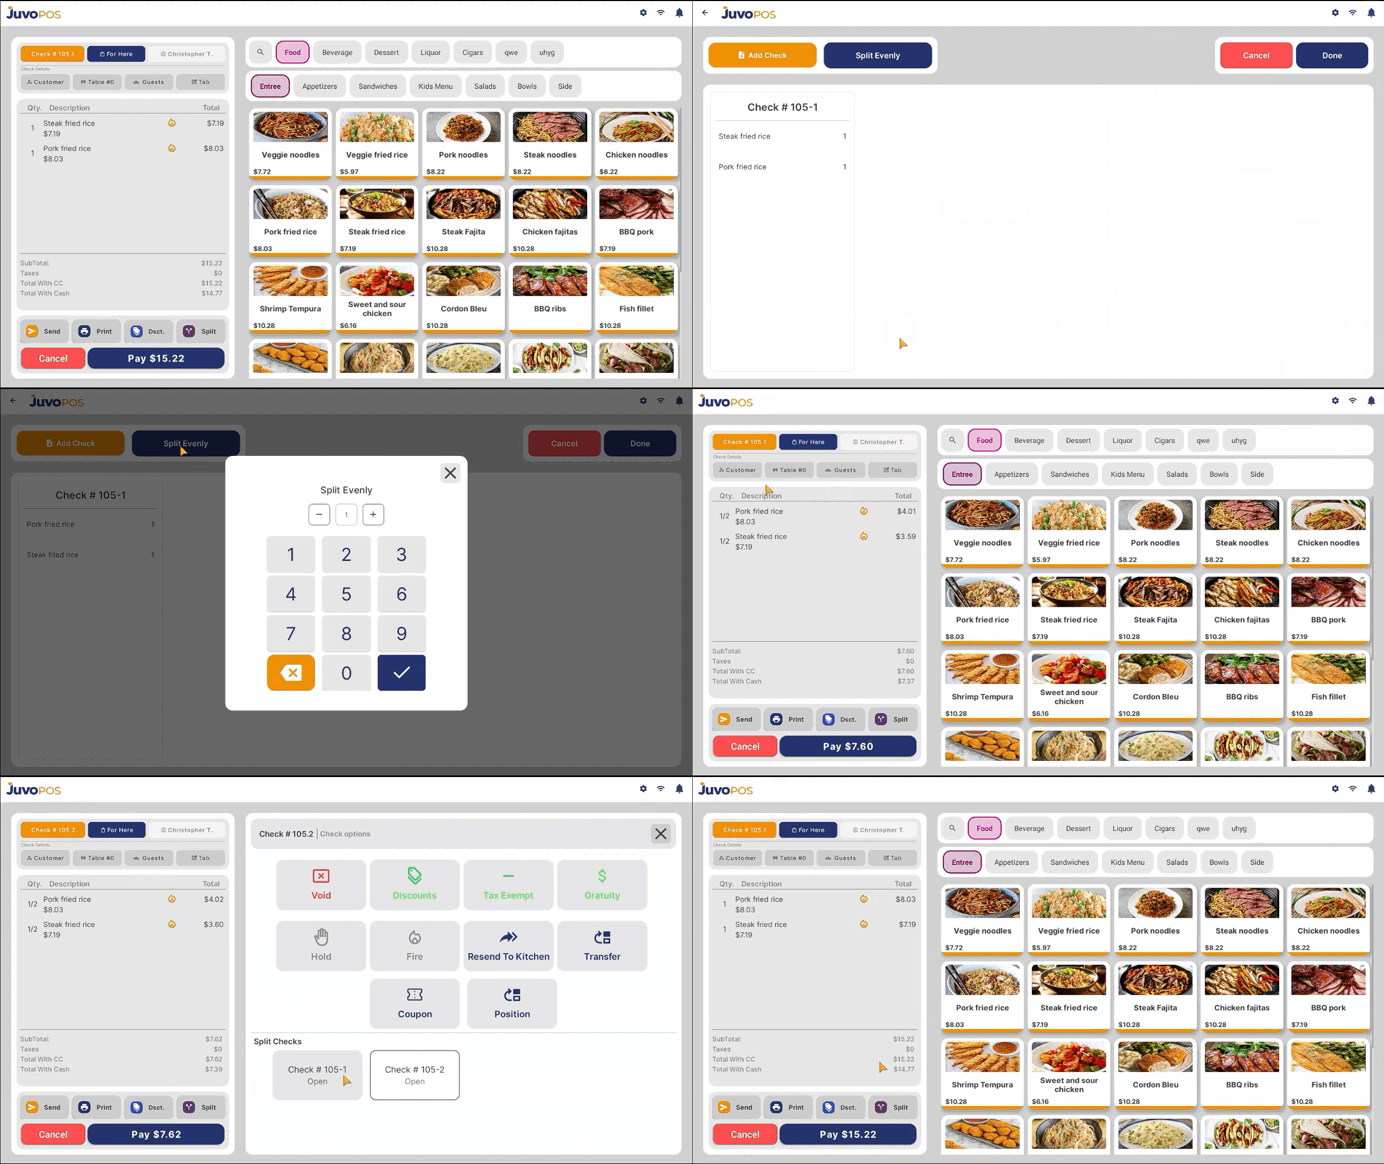
    In this guide, we will learn how to split a check into multiple checks, divide items between guests, split a check evenly, and combine previously split checks in Juvo POS.

    Part 1: Splitting a Check

    1. Open the check you want to split and tap the Split button.
    2. Add another check to create a separate check for the items you want to move.
    3. Drag and drop the items from the original check into the new check until the items are divided as needed.

    Part 2: Splitting a Check Evenly

    1. If you want to divide the check evenly, select Split Evenly.
    2. Enter the number of splits you want and confirm your selection. The system will divide the check into the requested number of portions.

    Part 3: Accessing Split Checks

    1. To view all the resulting checks, tap Check.
    2. You will see the individual split checks listed separately. For example, an original check numbered 105 may appear as 105.1 and 105.2.

    Part 4: Combining Checks

    1. If you need to combine previously split checks, open the check and tap Split.
    2. Select Combine and follow the available prompts to recombine the checks.

    Once completed, the checks will be combined into a single check.

  • Delete an Item from a Check – Juvo POS

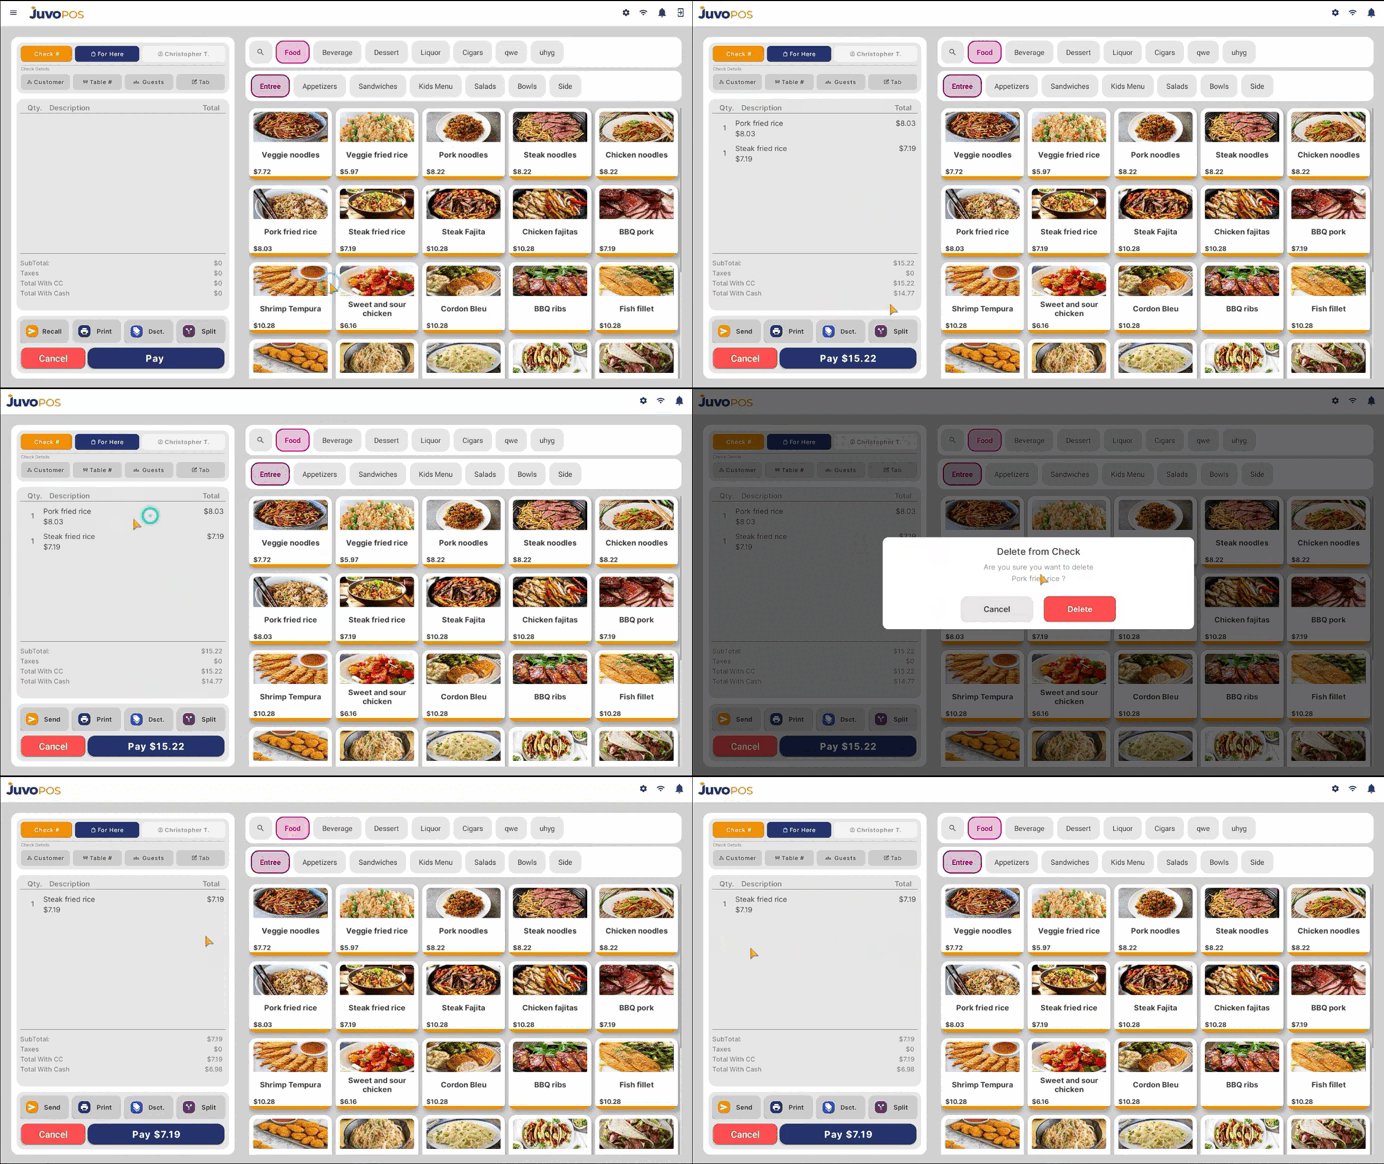
    In this guide, we will learn how to remove an item from an open check in Juvo POS.

    1. Open the check containing the item you want to remove.
    2. Locate the item and swipe left or right on it.
    3. A confirmation alert will appear asking, “Do you want to delete item from check?”
    4. Tap Delete to confirm your action.
    5. The selected item will be removed from the check.

    This feature allows you to quickly remove unwanted items from a check and correct orders when necessary.

  • Clock In – Juvo POS

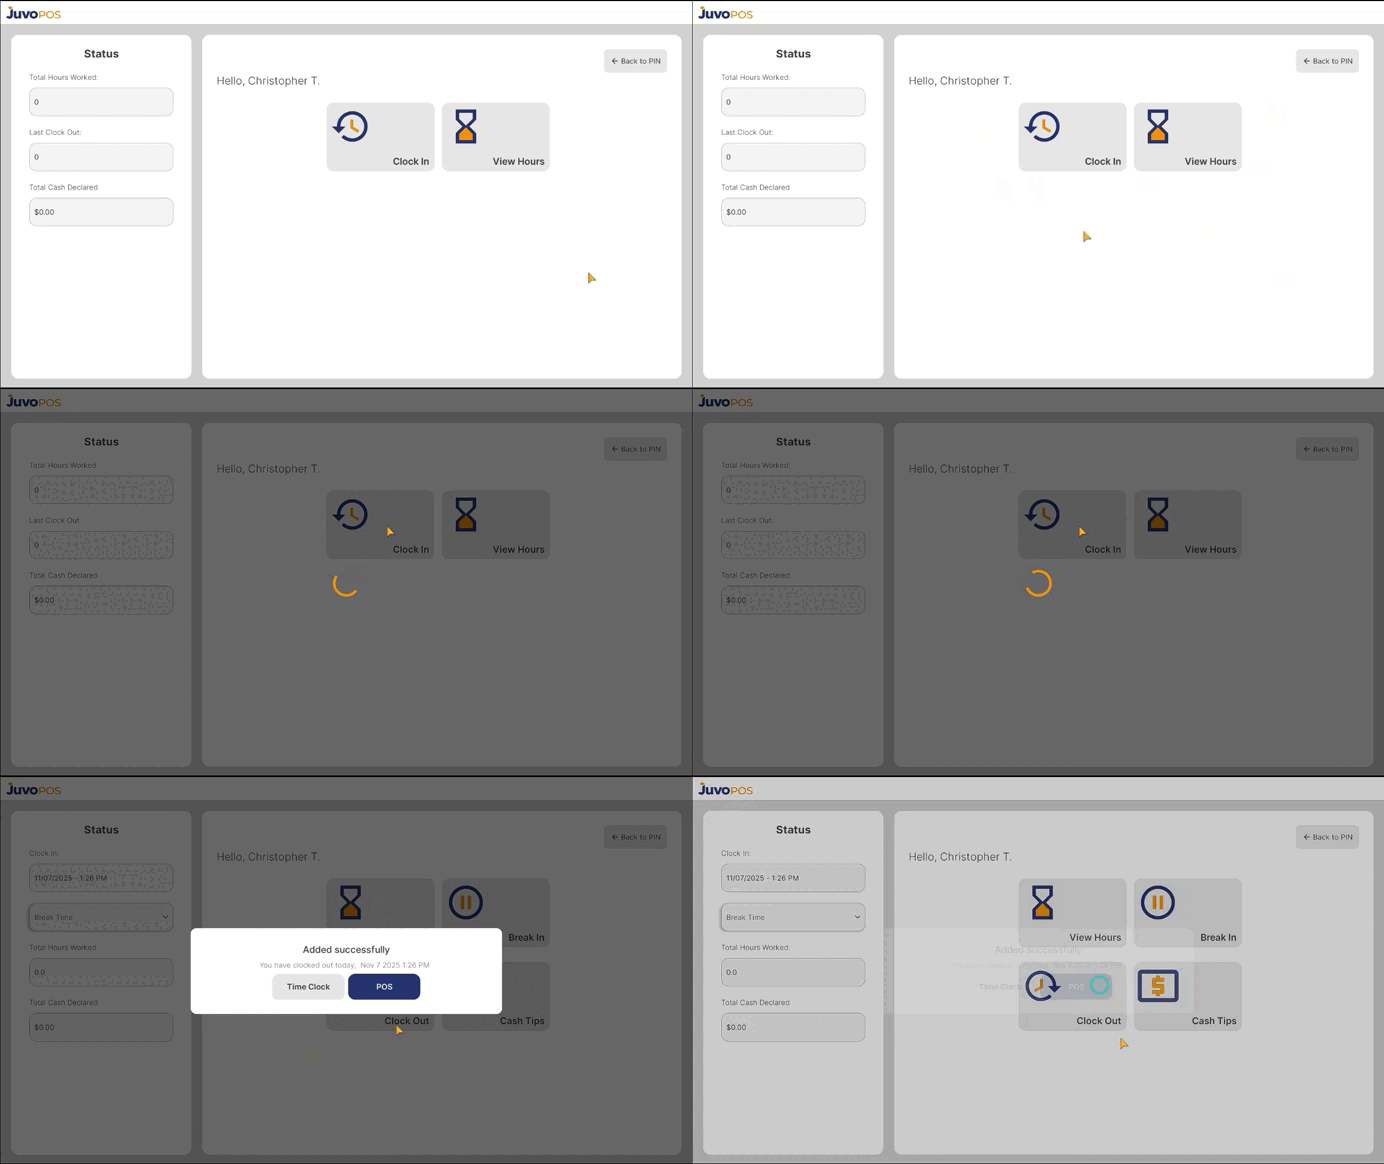
    In this guide, we will learn how to clock in to Juvo POS and start your work shift.

    1. From the main POS screen, enter your employee PIN.
    2. Tap the Check button to access the available employee options.
    3. Select Clock In, View Hours, or View Schedule.
    4. Choose Clock In to register the start of your shift.
    5. Wait a few seconds for the system to process your request. Once completed, you will be successfully clocked in to the POS system.

    Clocking in through Juvo POS allows you to record the beginning of your shift and helps maintain accurate employee timekeeping records.

  • Applying and Removing Discounts – Juvo POS

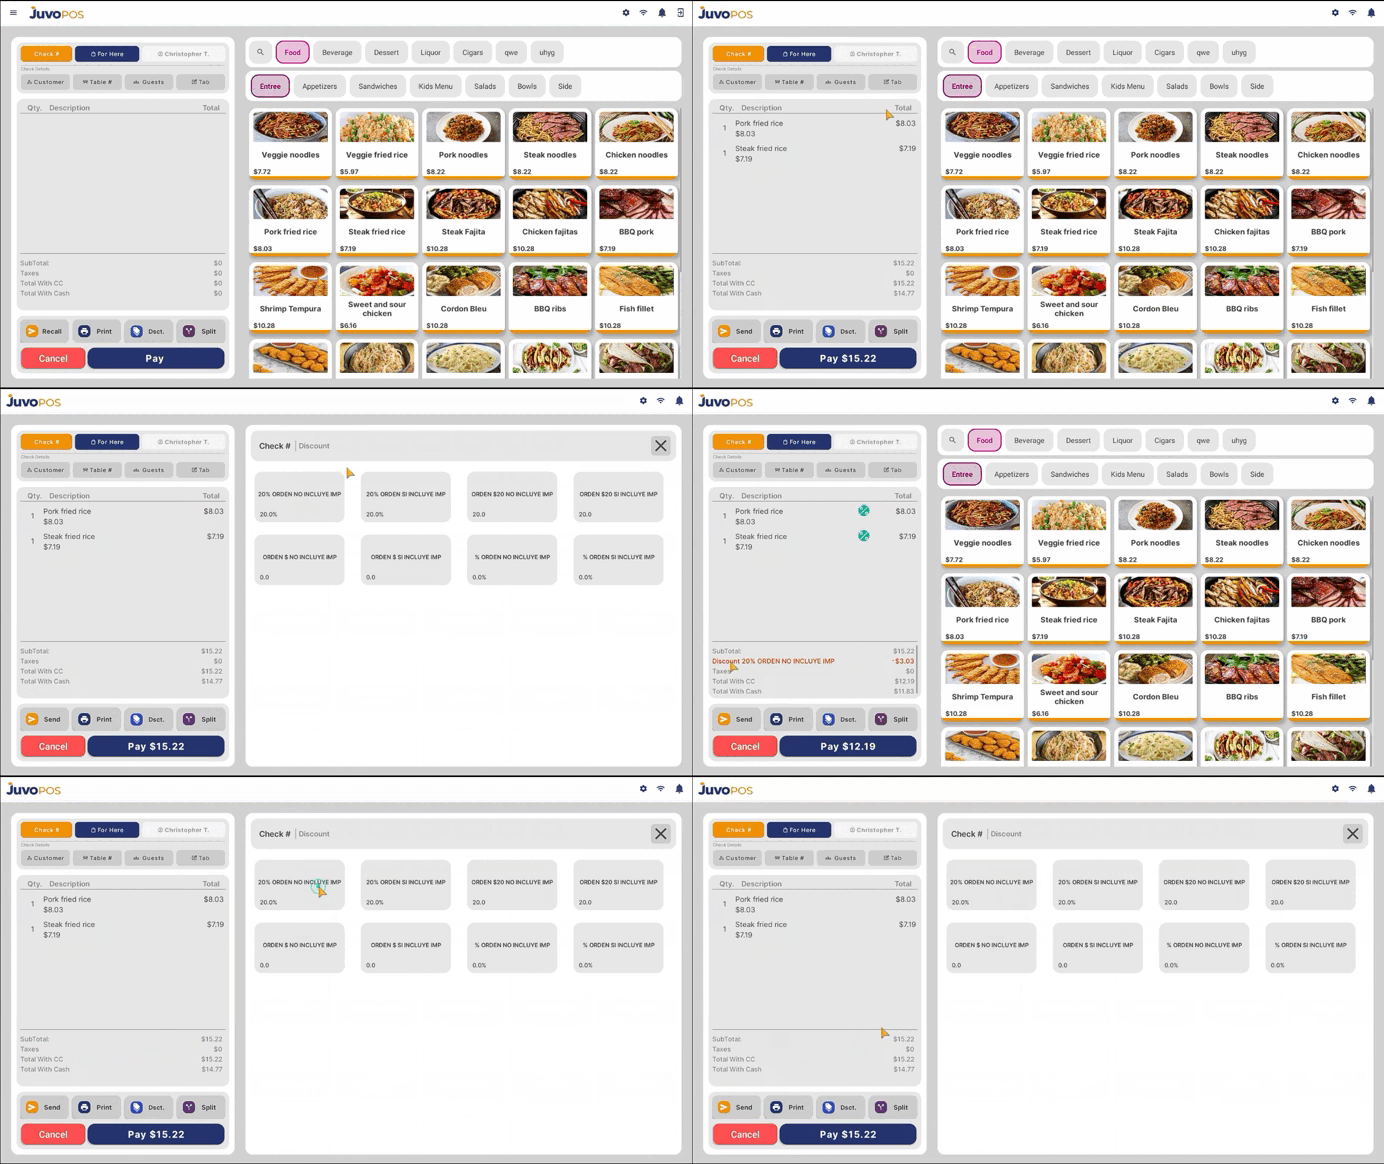
    In this guide, we will learn how to apply and remove discounts in Juvo POS, whether for an individual item or an entire check.

    1. Open the check where you want to apply a discount.
    2. Select the item you want to discount, or choose the option to apply a discount to the entire check.
    3. Tap Discount to view the available discount options.
    4. Choose the type of discount you want to apply, such as:
    • Percentage Discount: Apply a percentage off the selected item or check.
    • Fixed Amount Discount: Deduct a specific monetary amount.
    • Preset Discount: Select a predefined discount available in the system.
    1. Confirm your selection. The applied discount will appear under the selected item or at the bottom of the check when applied to the entire check.

    To Remove a Discount

    If you need to remove an existing discount, repeat the same process. Select the item or check where the discount was applied, open Discount, and unselect the previously applied discount. The discount will be removed from the selected item or check.

  • Record a Paid Out – Juvo POS

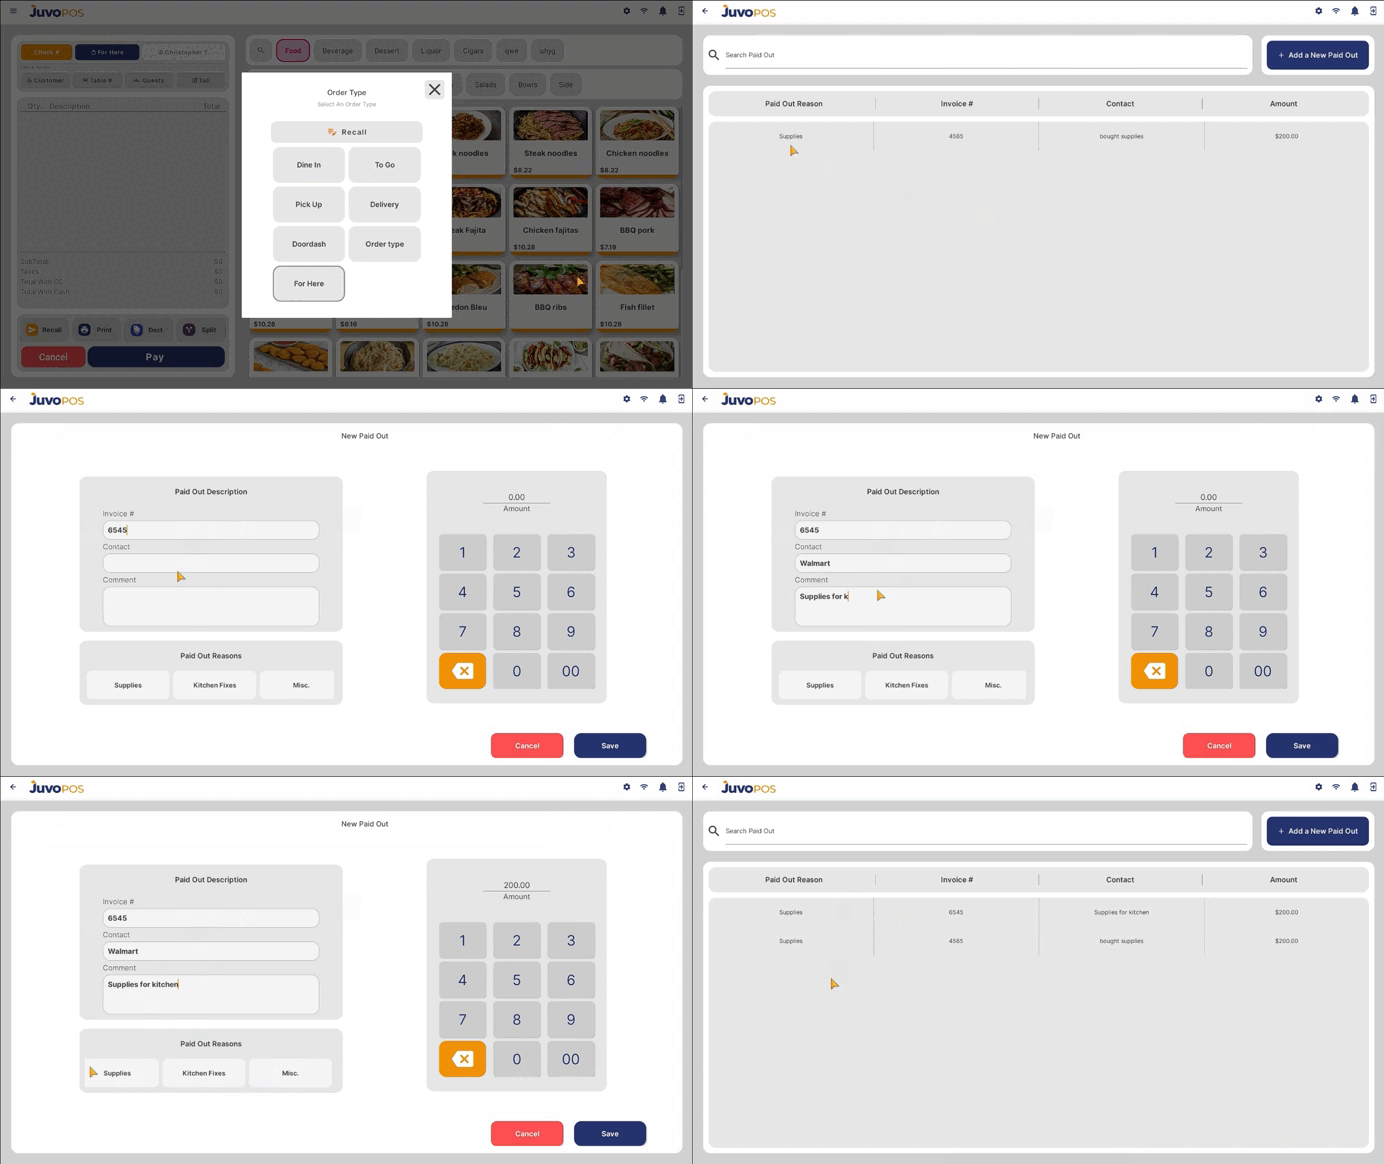
    In this guide, we will learn how to record a Paid Out transaction in Juvo POS to document money taken out of the register for business-related expenses or other purposes.

    1. From the main POS screen, open the Functions menu.
    2. Select Bank, then choose Paid Outs.
    3. Enter the required transaction details:
    • Amount: Enter the amount being paid out.
    • Reason: Select or enter the reason for the transaction.
    • Invoice: Enter the invoice number, if applicable.
    • Comment: Add any additional notes or details about the transaction.
    • Contact: Select the contact associated with the transaction.
    1. Review the information entered to ensure all details are correct.
    2. Confirm the transaction to record the Paid Out in the system.

    Recording Paid Outs in Juvo POS helps track cash removed from the register and maintain accurate records of business expenses and cash movements.

  • Split Payment – Juvo POS

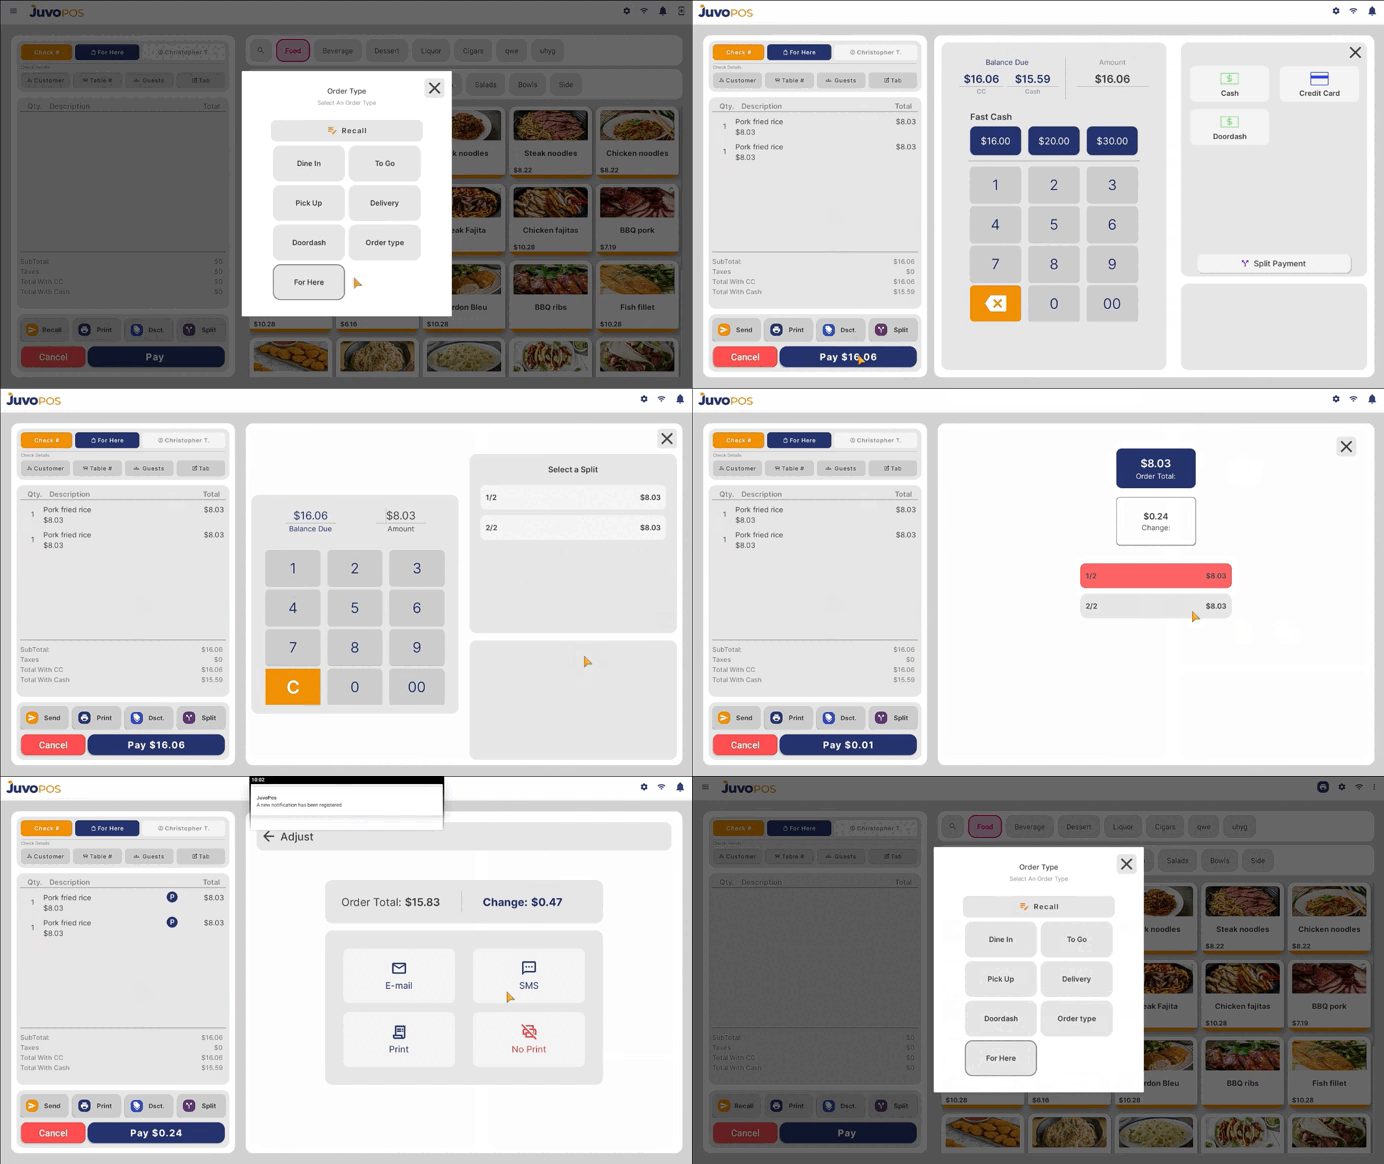
    In this guide, we will learn how to split a payment in Juvo POS, allowing customers to pay for a check using multiple payments.

    1. Open the check you want to pay and proceed to Checkout.
    2. Select Split Payment to begin dividing the check total.
    3. Choose how you want to split the payment: Split Evenly to divide the total into equal portions, or Custom Amounts to enter specific amounts for each payment.
    4. Select the payment method for each portion. Depending on your needs, you can use Cash, Card, or a combination of payment methods.
    5. Process each payment portion individually until the full check balance has been paid.
    6. Confirm that the remaining balance is zero to ensure the check has been fully paid.

    The Split Payment feature provides flexibility at checkout, making it easier for multiple customers to share a check or pay using different payment methods.

  • Adding a Shift – Juvo POS

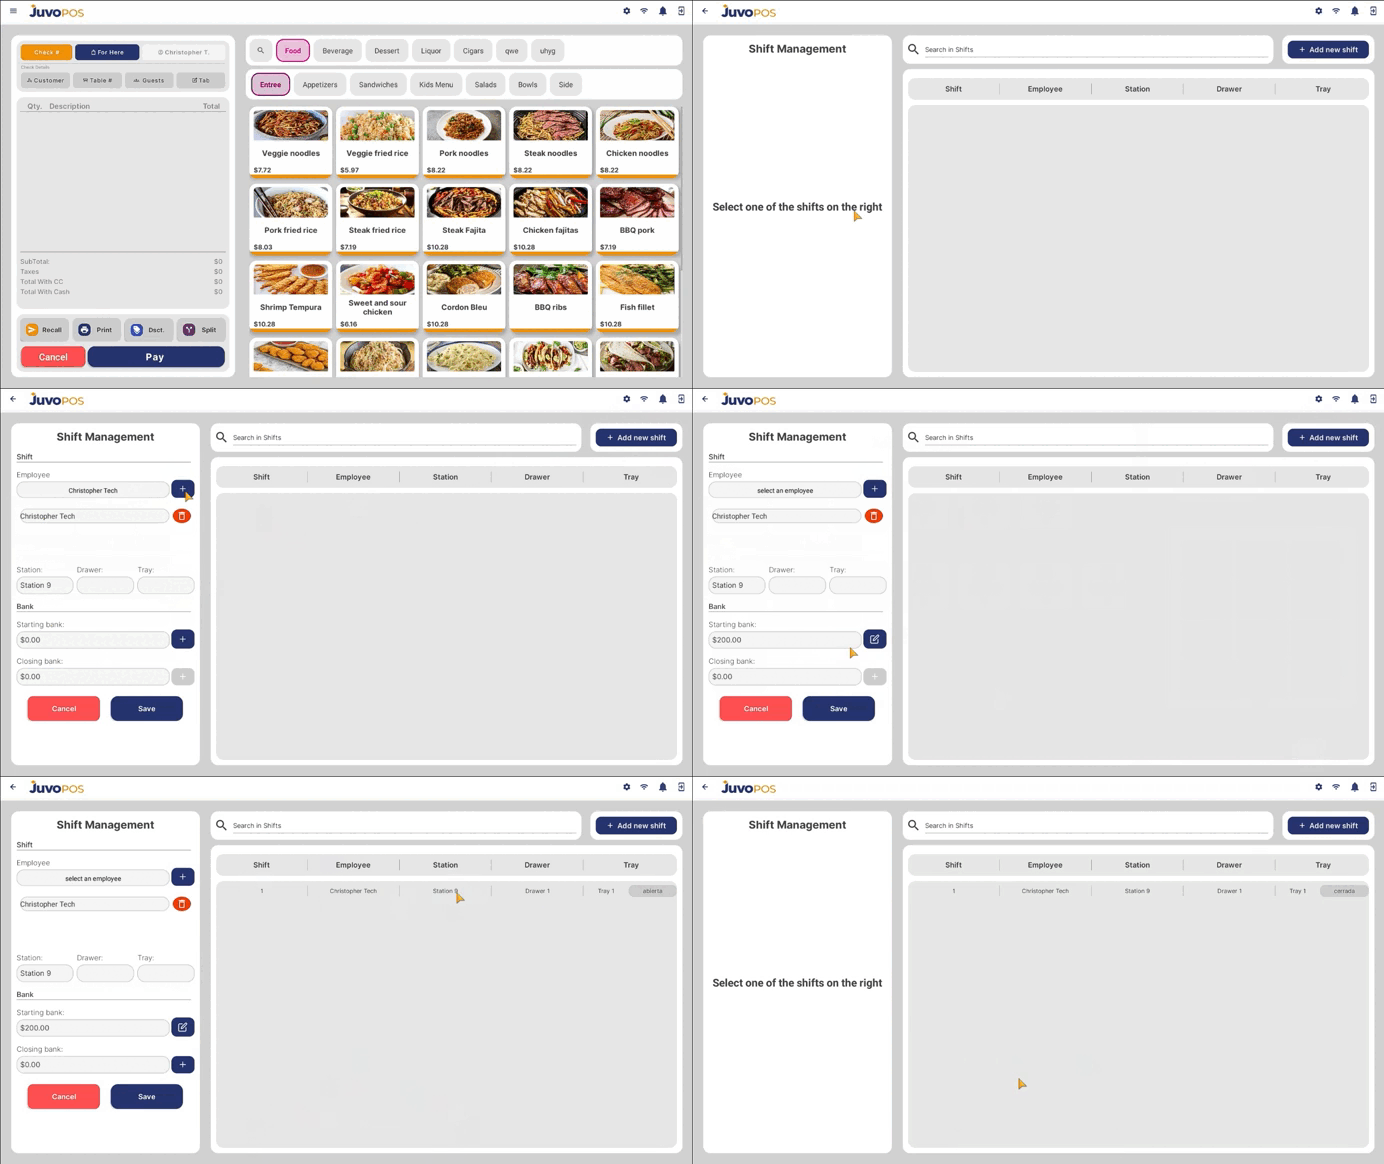
    In this guide, we will learn how to create and manage an employee shift in Juvo POS, including recording the starting and closing bank amounts.

    1. From the main POS screen, open the Functions menu.
    2. Select Bank, then choose Shift.
    3. Tap Add Shift to begin creating a new shift.
    4. Select the employee assigned to the shift.
    5. Enter the Starting Bank amount, which represents the initial cash amount in the register at the beginning of the shift.
    6. Tap Update to save the shift information.
    7. When the employee finishes the shift, return to the shift information and update the Closing Bank amount to record the final cash balance.

    Properly recording the starting and closing bank amounts helps track register cash, manage employee shifts, and maintain accurate cash records throughout daily operations.