Tag: juvopos

  • Juvo POS – Quick Edit in Menu

    Purpose: Learn how to quickly edit menu items directly from the Juvo POS without accessing the Back Office (BO).

    Step 1: Select a Menu Item

    From the main POS menu screen, locate the menu item you want to edit.

    Step 2: Press and Hold

    Press and hold the selected menu item until a warning message appears on the screen.

    Step 3: Confirm Edit Mode

    A warning message will inform you that you are about to enter Edit Mode. Review the message and confirm to proceed.

    Step 4: Edit Your Menu Items

    Once Edit Mode is activated, you can make changes to your menu items directly from the POS.

    Step 5: Complete Your Changes

    Make the necessary adjustments to your menu items and follow the on-screen options to complete your edits.

    Note: Use this feature carefully to ensure that any changes made to the menu are intentional and accurate.
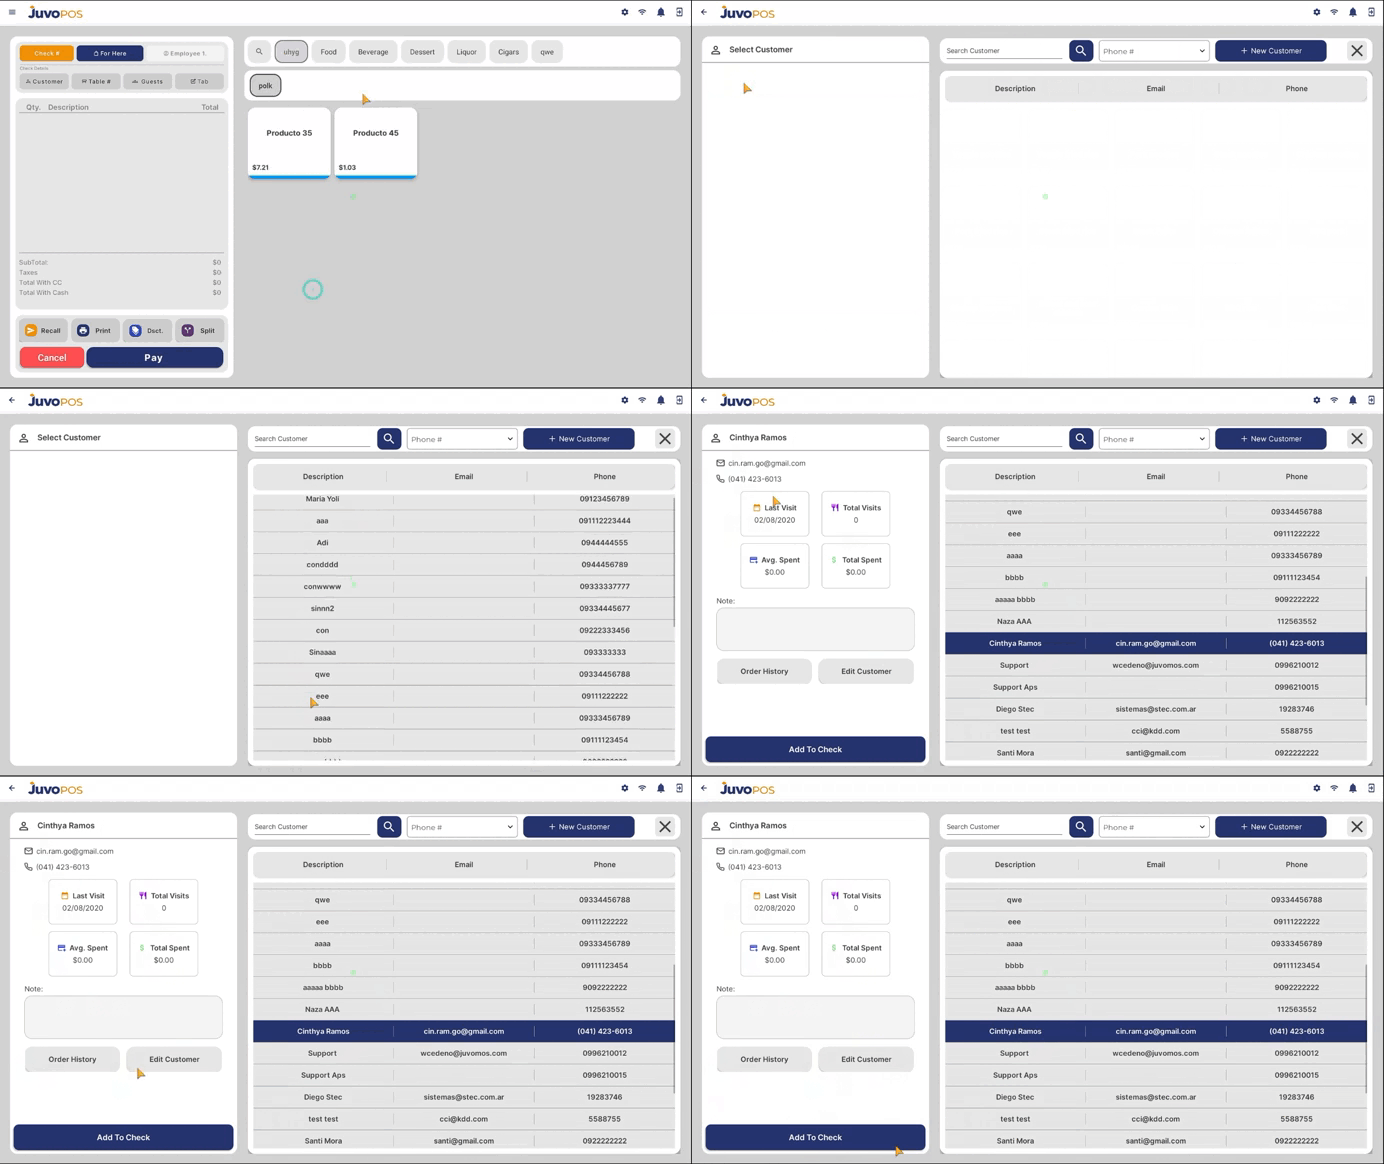
  • Customer History – Juvo POS

    In this guide, we will learn how to access customer history in Juvo POS and review important information about returning customers.

    1. When creating a new check, navigate to the Customer section.
    2. Tap the Search icon to view the list of customers previously added to the system.
    3. Search for and select the customer you want to review.
    4. Once the customer is selected, you can access their available history and information, including:
    • Last Visit: When the customer last visited your business.
    • Total Visits: The total number of recorded visits.
    • Average Spent: The customer’s average spending amount.
    • Additional Information: Other available customer details and visit history.

    Juvo POS allows you to save customer information for future visits, making it easier to recognize returning customers, track their visit history, and better understand their spending habits.

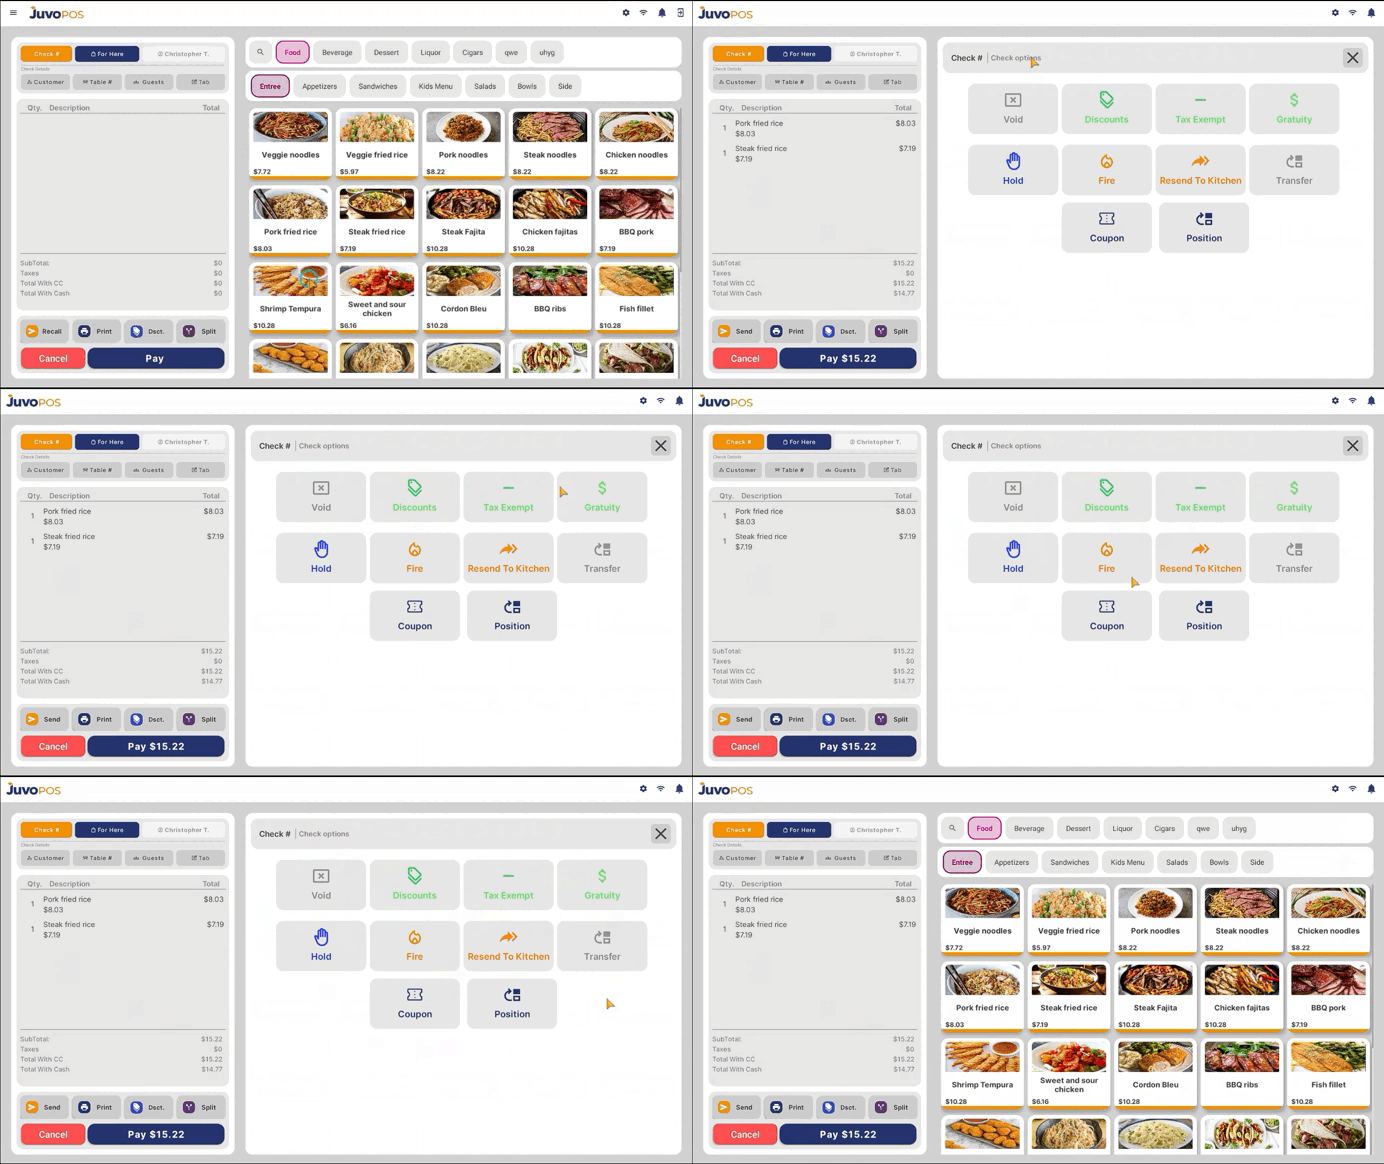
  • Check Options – Juvo POS

    In this guide, we will learn how to access the available check management options in Juvo POS.

    1. Open a check and tap Check to access the available check options.
    2. Review the options displayed. Depending on your configuration and permissions, these may include:
    • Void: Void the check when necessary.
    • Discounts: Apply available discounts to the check.
    • Tax Exempt: Apply a tax exemption when applicable.
    • Additional Options: Access other available functions for managing the check.

    These options allow you to manage checks efficiently, apply adjustments when needed, and handle different situations during the checkout process.

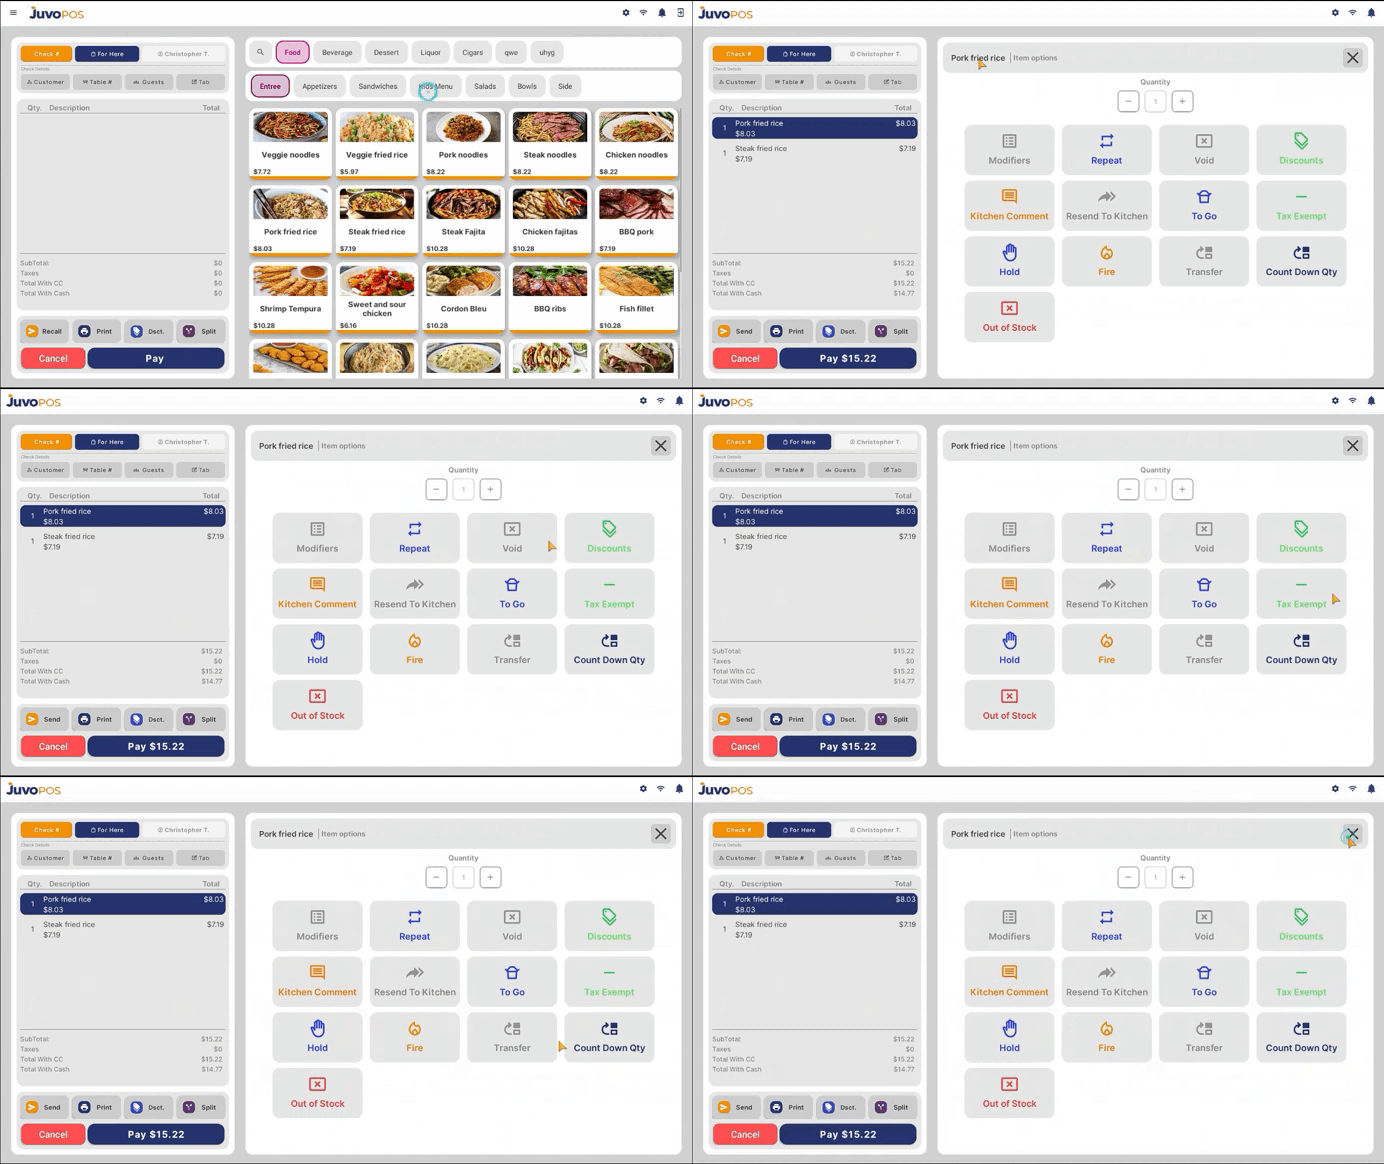
  • Item Options – Juvo POS

    In this guide, we will learn how to access the available options for an item directly from an open check in Juvo POS.

    1. Open a check and select the item you want to modify.
    2. Once the item is selected, the available Item Options will be displayed.
    3. Choose the appropriate option based on your needs. Available options may include:
    • Mods: Modify the item’s options or selections.
    • Repeat: Add the same item to the check again.
    • Void: Remove the item from the check, subject to the applicable permissions and requirements.
    • Many more.

    These options allow you to manage individual items directly from the check, making it easier to modify orders and handle changes during service.

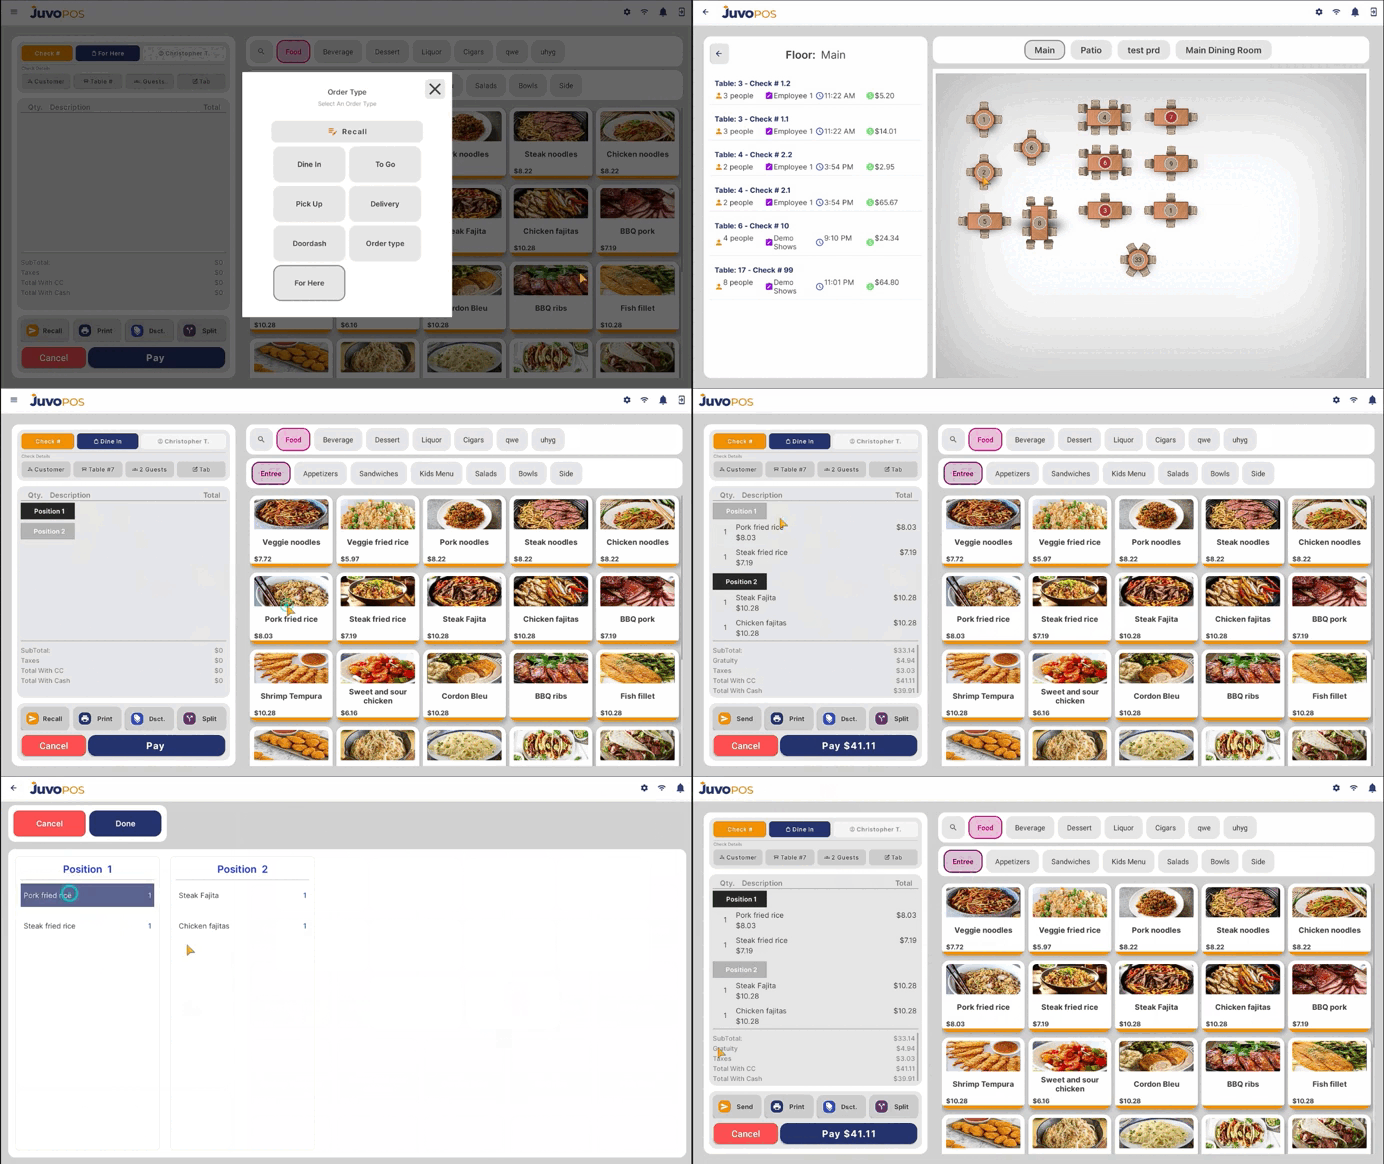
  • Positions – Assigning Items by Guest

    In this guide, we will learn how to use the Positions feature in Juvo POS to assign items to individual guests and simplify check splitting.

    1. Make sure the Positions feature is enabled in the Back Office (BO).
    2. Open a check and begin assigning items to the appropriate guest position.
    3. Select Position 1 and assign the items ordered by the first guest.
    4. Tap Position 2 and continue assigning the items ordered by the second guest. Repeat this process for each additional guest as needed.
    5. Once all items have been assigned to their respective positions, you can easily split the check so each guest can pay for their own items.

    The Positions feature helps organize orders by guest, making it easier to manage shared checks and ensure each client pays for what they ordered.

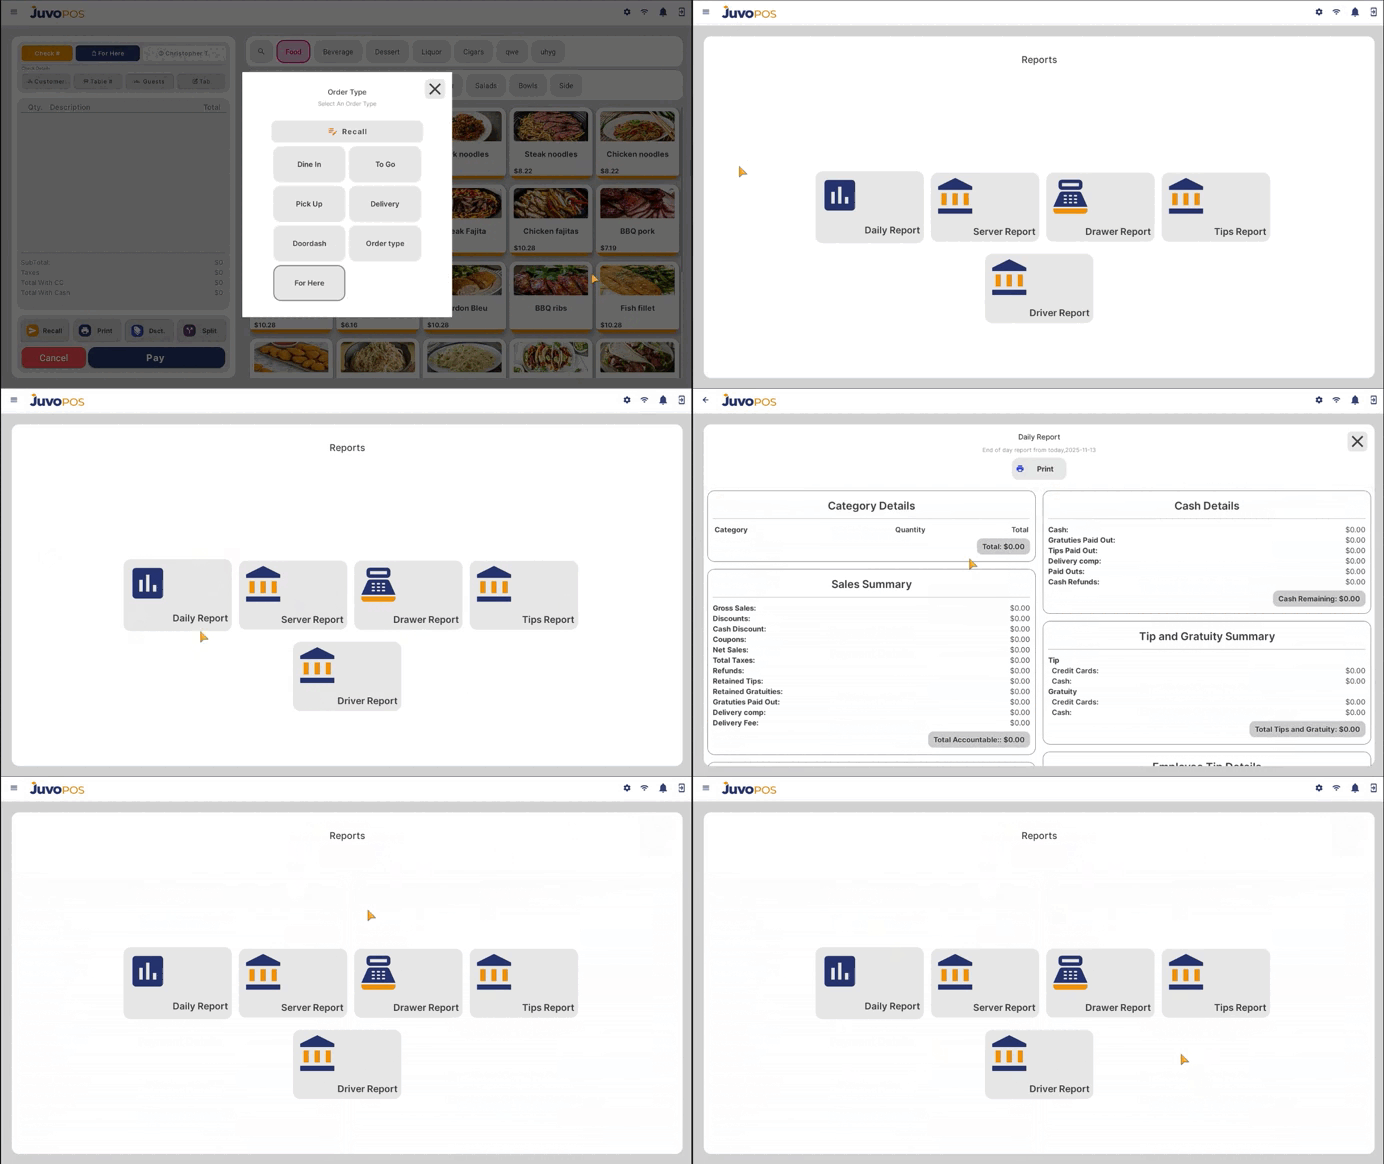
  • Reports – Juvo POS

    In this guide, we will learn how to access and review daily business reports in Juvo POS.

    1. From the main POS screen, open the Functions menu.
    2. Select the Reports section to access the available reports.
    3. Review your daily business information to monitor your store’s activity and performance.
    4. If needed, use the available print option to print the report for your records.

    Juvo POS makes it easy to access your daily business reports directly from the POS, helping you review important business information and keep track of your daily operations.

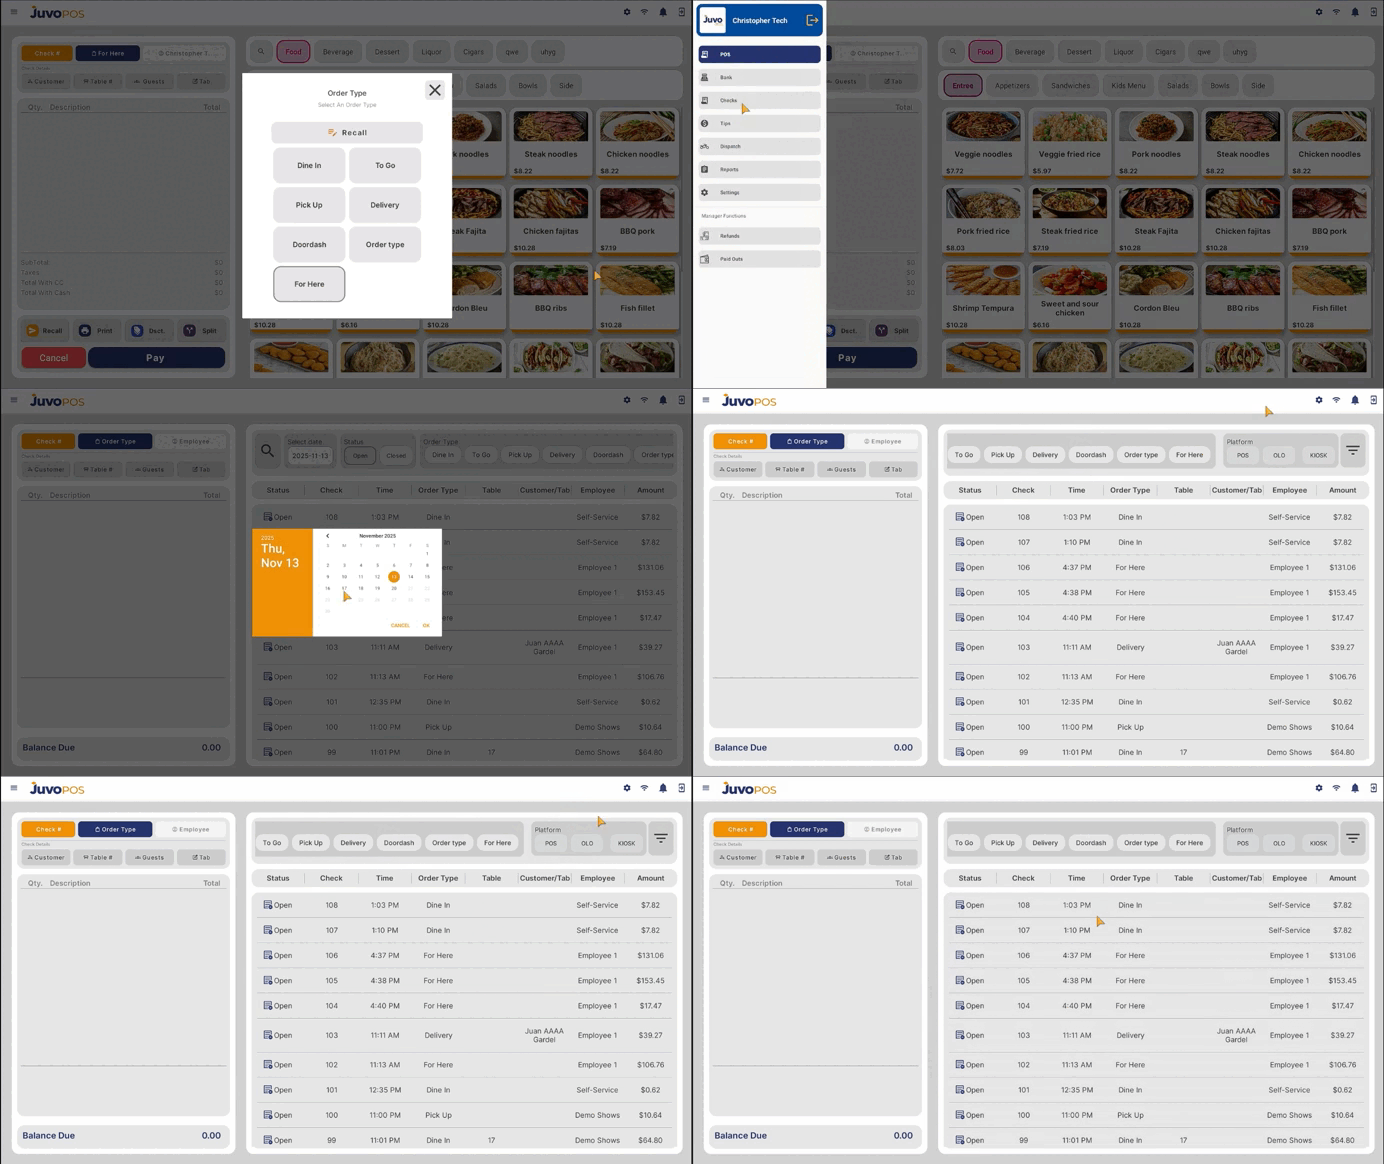
  • View All Checks – Juvo POS

    In this guide, we will learn how to access and manage all checks in Juvo POS.

    1. From the main POS screen, open the Functions menu.
    2. Select Checks to access the list of checks.
    3. Use the available search and filter options to quickly find specific checks based on your needs.
    4. Take advantage of Juvo’s multiplatform functionality to filter checks by their source: POS, Kiosk, or OLO (Online Ordering).
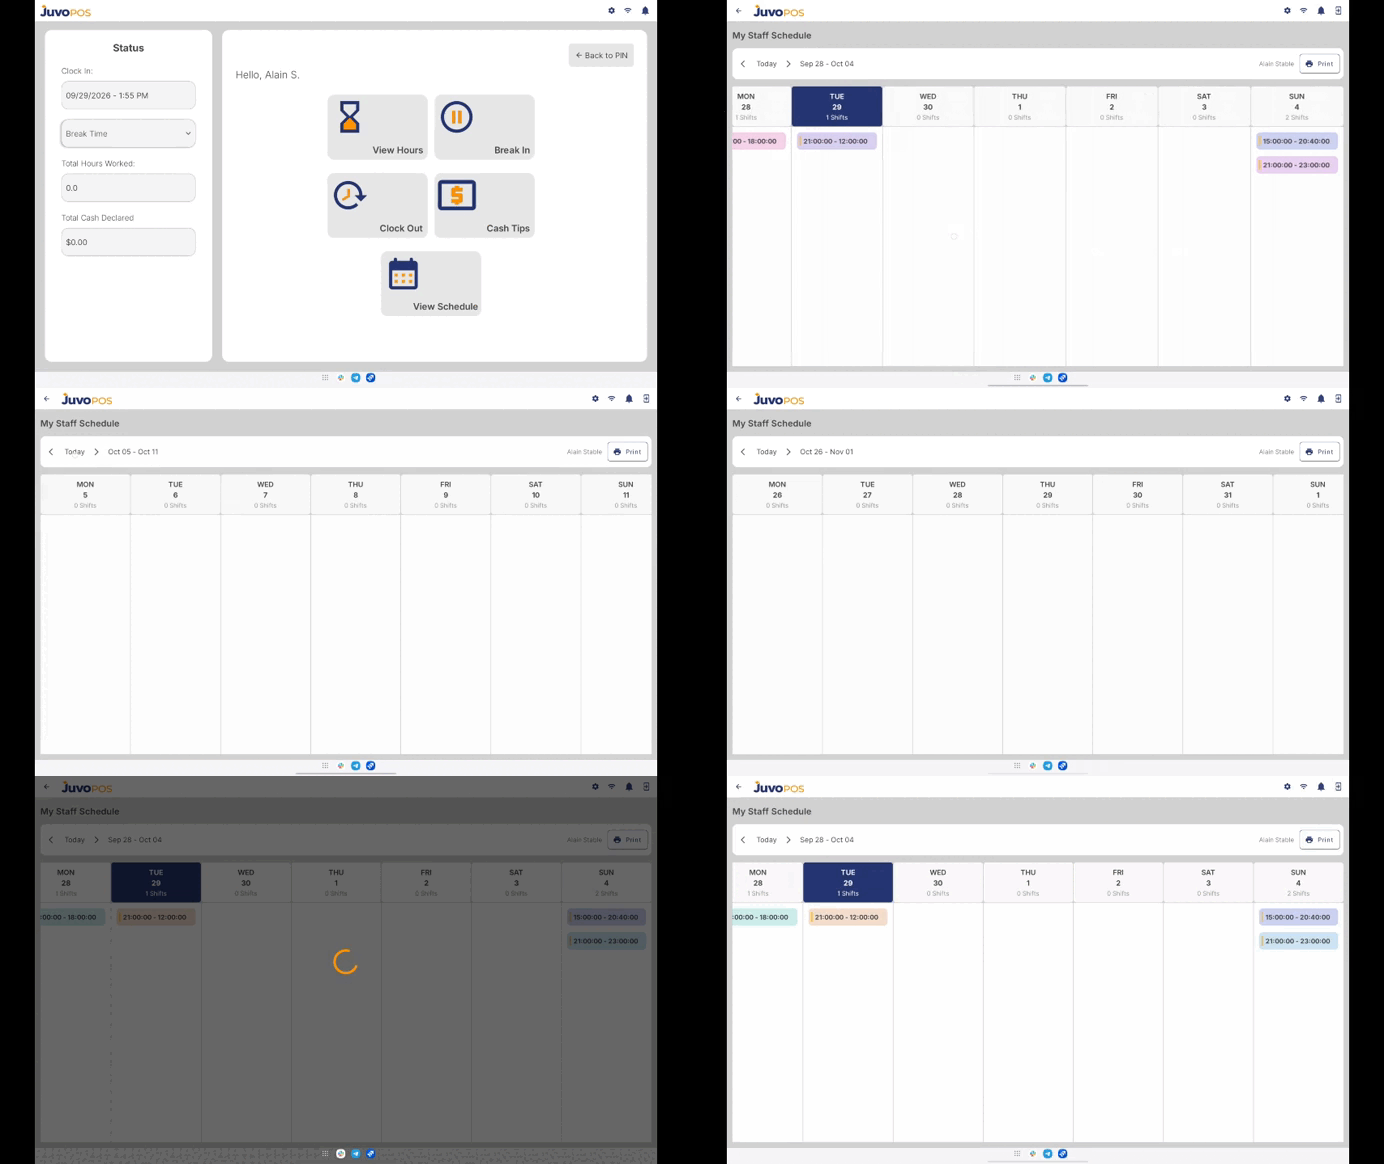
  • View Schedule – Juvo POS

    Once the schedule has been created in the BO and synced with the POS, employees can view their schedule directly from the Time Clock.

    Step 1: Open Time Clock

    1. On the POS, select Time Clock.
    2. Enter your employee PIN to clock in.

    Step 2: Select View Schedule

    After entering the PIN, the employee will see the View Schedule option. Select View Schedule to access the schedule that was created in the BO.

    Step 3: View the Weekly Schedule

    Employees can:

    • View their scheduled shifts for the week.
    • Review their dates and scheduled times.
    • Check their upcoming shifts directly from the POS.

    Step 4: Print the Schedule

    If a physical copy is needed, employees can select the Print option to print their schedule.

    Important

    The schedule displayed on the POS comes directly from the Staff Schedule created in the BO. If a schedule is added or changed in the BO, make sure the POS is synced so the latest schedule is available to employees.

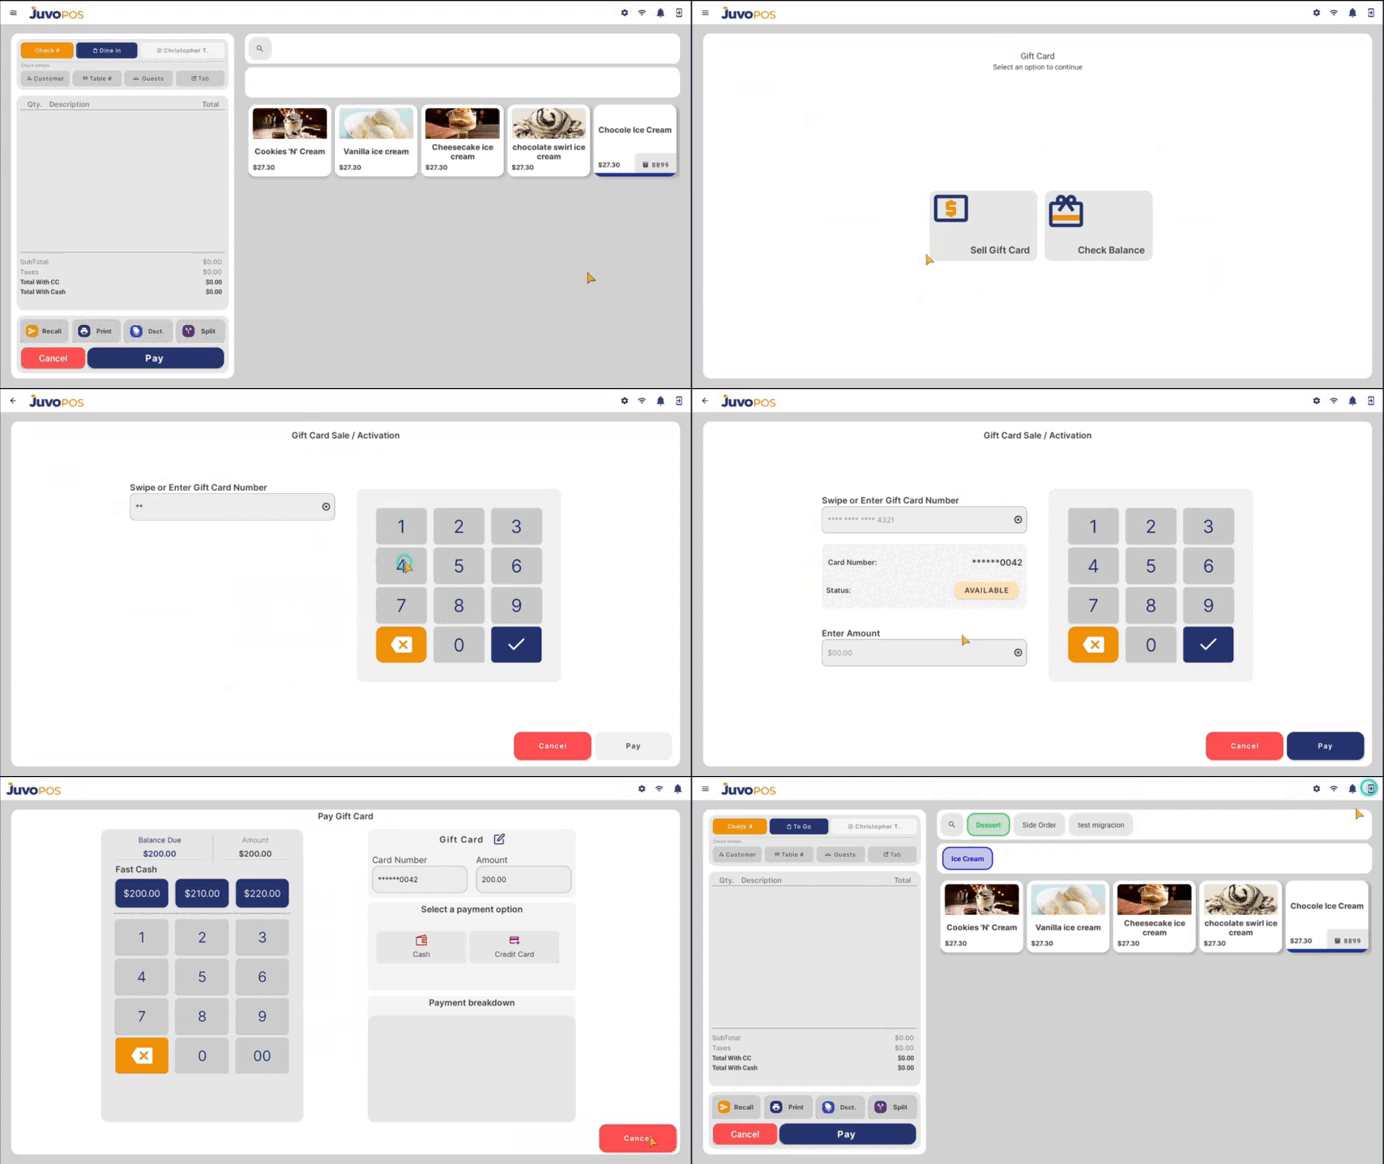
  • Gift Card – Juvo POS

    After the gift cards have been successfully uploaded in the Back Office, use the POS to activate or sell a gift card or check its balance.

    1 Activate or Sell a Gift Card

    1. Go to the POS.
    2. Open the Functions Menu.
    3. Select BANK.
    4. Select Gift Cards.
    5. Enter the number of a gift card that was previously uploaded in the Back Office.
    6. Select the gift card you want to activate or sell.
    7. Follow the POS prompts to complete the transaction.
    8. Complete the sale according to the normal POS process.

    Navigation: Functions Menu → BANK → Gift Cards

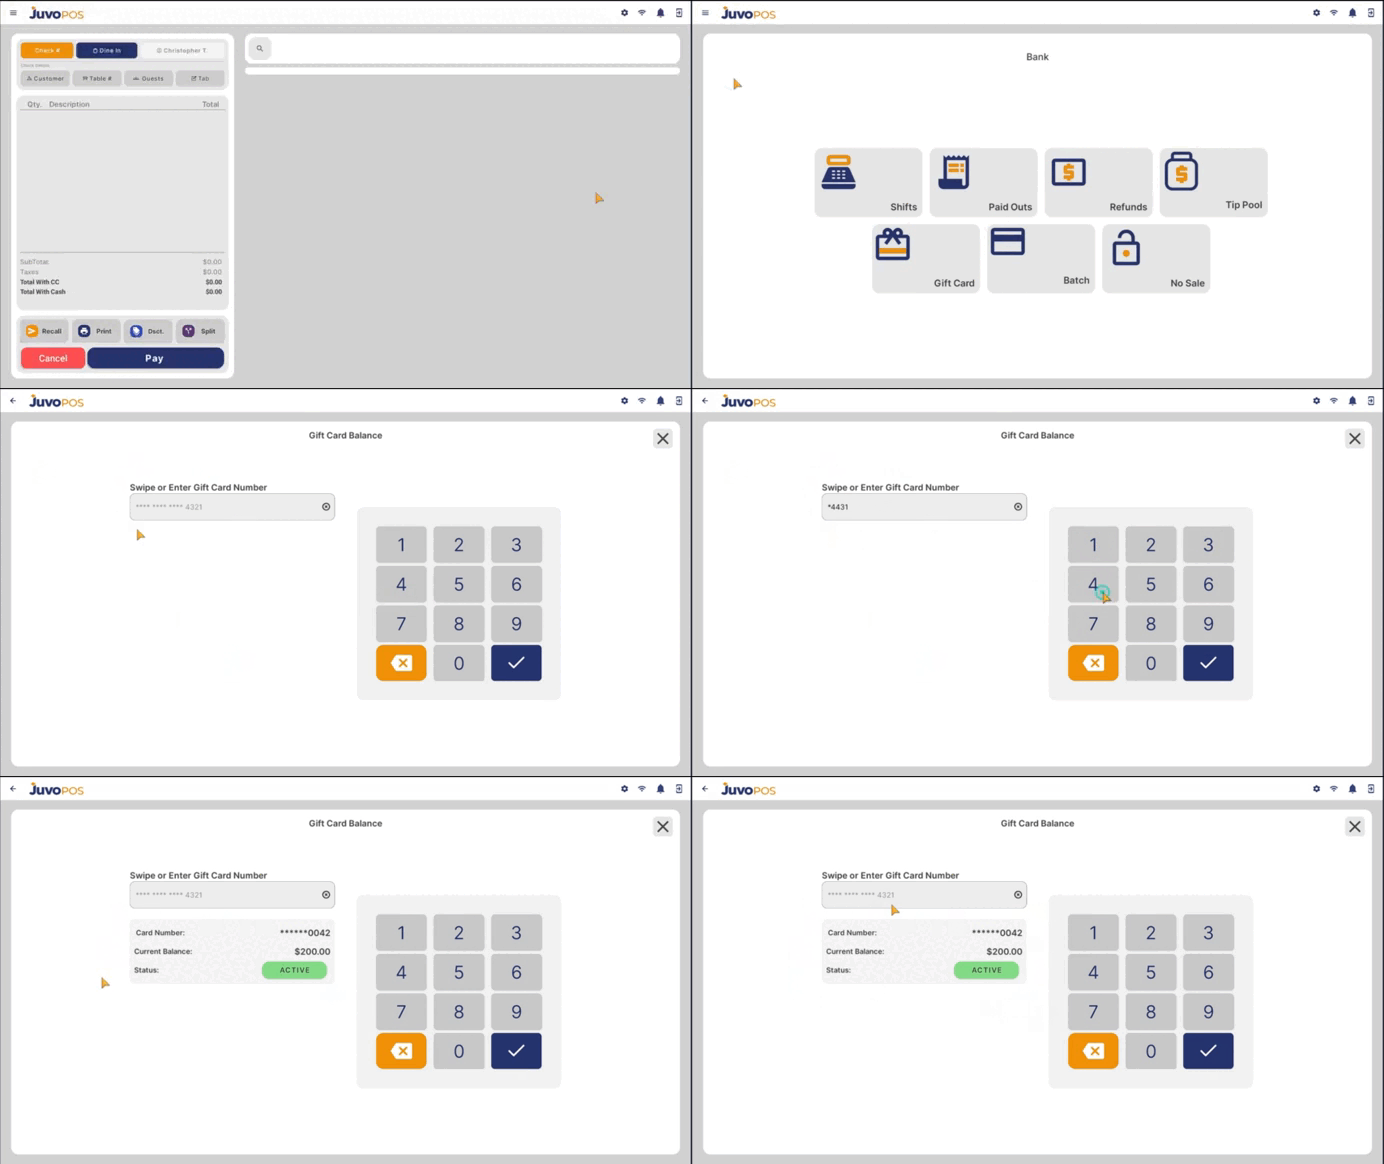
    2 Check Gift Card Balance

    1. Open the POS Functions Menu.
    2. Select BANK.
    3. Select Gift Cards.
    4. Enter the gift card number.
    5. Select the option to check the balance.
    6. Review the balance displayed by the system.